SCHMIDT® Safety Check and Press Calibrations
Our Services
SCHMIDT® safety check for all SCHMIDT® press systems with type examination
Service content of the safety check
- Testing according to ZH 1/456
- Measurement and testing of the two-hand control
- Overrun measurement
- Functional safety check
- General functional test
- Issue of a test report
- Inspection sticker on the machine
For light curtain systems
- Additional testing according to ZH 1/281

Calibration
SCHMIDT Technology is one of the few press manufacturers accredited by the DAkkS (national accreditation body of the Federal Republic of Germany) for the measurement parameter “Force” (1).
DAkkS is the abbreviation of the German accreditation body. TheAccreditation certificate is proof that the laboratory has the required competence and uses an officially recognized calibration procedure. Only calibration laboratories accredited by the DAkkS according to DIN EN ISO/IEC 17025 are authorized to issue DAkkS-accredited calibration certificates with the DAkkS accreditation symbol.
Benefit from accredited calibration certificates
(DAkkS-accredited calibration) (1):
- Best possible safety
- Competent performance of the calibration
- International recognition
- Guaranteed traceability

member of Deutschen Kalibrierdienst

On-site calibration
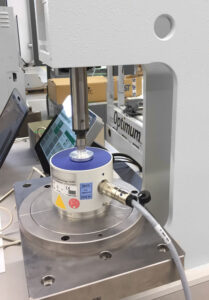
We are accredited for on-site calibration of the measurement parameter “Force”. We calibrate your press directly in your production facility using mobile equipment. As an alternative, we can carry out an “on-site calibration” in our calibration area.
Quality assurance by means of DAkkS-accredited calibration (1)
Our calibration certificates for accredited calibrations (1) can be issued with two different conformity statements depending on the selected confidence level. Please let us know which version you need!
DAkkS-accredited calibration certificates represent the highest industrial calibration standard in Germany. They have the highest reliability, are internationally recognized and binding in court.
Meet the requirements of the applicable standards and regulations, for example for the automotive or medical engineering industry (ISO 9000 ff, IATF 16949, regulation (EU) 2017/745, etc.) for a fully traceable documented calibration procedure and thus ensure international comparability and recognition of your measurement results.


Scope of testing during the DAkkS-accredited calibration(1)
With this accredited calibration certificate (1), your press is calibrated for the measurement parameter “Force” – based on national measurement standards.
Calibration includes checking and confirming the functionality of the force measurement and is carried out according to the following procedure:
- Preload before calibration in test direction “Pressure” with maximum calibration force.
- Determination of the display values after three measurement series with increasing force, test direction “Pressure”.
- After the 1st (R1) and 2nd (R2) measurement series, the reference standard is rotated by 120 degrees.
- The calibration object is zeroed before each series of measurements.
- After each series of measurements, the zero offset after unloading is read.
Standard values for force levels: 10%, 20%, 40%, 60%, 80% and 100% of the nominal force. During calibration of electrical presses, two further force levels can be calibrated: ½ (peak value – nominal force) and peak value. After consultation, deviating force levels are taken into account.
Scope of factory calibration
For the force/stroke-monitored SCHMIDT® press systems, calibration includes the following services on site: check of the measurement system, calibration, issue of the calibration certificate and application of a calibration sticker to the machine.
What is the difference between a DAkkS-accredited calibration and a factory calibration?
The significant difference between the two calibration procedures is that only a calibration according to an accredited procedure (1) (“DAkkS-accredited calibration”) guarantees traceability to the national standard. A calibration hierarchy is created in accordance with the ranking of the standards – from the working or factory standard through the reference standard to the national standard.
The measurement results with associated measurement uncertainty are determined and documented. Compared to factory calibration, calibration according to ISO/IEC 17025 is internationally recognized, usually has less measurement uncertainty and is also more comprehensive.
Presentation of the different verification options from factory calibration to accredited measurement (DAkkS; formerly also DKD) to the national metrology institute, the PTB.
.
PTB/
national standard
.
SCHMIDT®
DAkkS-accredited calibration (1)
.
.
SCHMIDT®
factory calibration
.
.
Price upon request
+49 (0) 77 24 / 8 99-0
(1) Accredited services shall be in accordance with the scope of accreditation listed in the attachment to certificate D-K-21939-01-00. All other services do not include an accredited report and consequently are not covered by the EA MLA.
